
Chimney, Pipe & Venting
Description
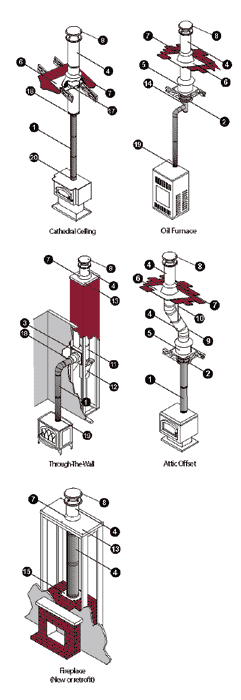
| Installation Key | |||
| 1 | DYL or DuraBlack | 11 | Tee with Tee Cap |
| 2 | Ceiling Support Box | 12 | Tee Support |
| 3 | Wall Thimble | 13 | Chase Top Flashing |
| 4 | Chimney Pipe | 14 | Base Tee/Double Tee |
| 5 | Attic Insulation Shield | 15 | Anchor Plate |
| 6 | Flashing | 16 | Firestop Radiation Shield* |
| 7 | Storm Collar | 17 | Roof Support |
| 8 | Chimney Cap | 18 | Finishing Collar |
| 9 | Elbow | 19 | DYL Adapter, DuraBlack Slip Connector, or Snap-Lock Adapter |
| 10 | Elbow Strap | 20 | Stove Adapter |
*not shown
- Refer to our Typical Installation drawings to select the appropriate component parts for your installation.
- DVL/DuraBlack Chimney Adapter must be used when connecting DVL pipe to a ceiling support box or finishing collar. When Connecting DuraBlack pipe, a DuraBlack Slip Connector or Snap-Lock Adapter must be used.
- Wall Thimble must be installed with an appropriate length of chimney pipe for all horizontal through-the-wall installations. To accommodate thicker walls, the telescoping pieces can be separated, and a field-fabricated extension may be installed.
- Attic Insulation Shield must be used in all installations that pass through an attic, regardless of whether the attic is insulated or not.
- Firestop Radiation Shield must be used when a chimney passes through a floor or ceiling without a support box.


| Installation Key | |||
| 1 | Vertical Cap | 9 | 90º Elbow |
| 2 | Storm Collar | 10 | Round Horizontal Cap |
| 3 | Flashing | 11 | Wall Thimble |
| 4 | Cathedral Ceiling Support Box | 12 | Ceiling Support Firestop Spacer |
| 5 | Straight Length Pipe | 13 | Tee w/Clean-Out Tee Cap |
| 6 | 45º Elbow | 14 | Wall Strap |
| 7 | Appliance Adapter | 15 | Attic Insulation |
| 8 | 60º Flexible Length | ||
- Refer to our Typical Venting Installation drawings to select the appropriate component parts for your installation.
- The inner pipe diameter should match the outlet size of the appliance. For installations that require 4″ vent and the appliance has a 3″ outlet, use an Increaser Adapter 3″-4″.
- Check the appliance manufacturer’s Installation Instructions to confirm which types of vent configurations are permitted (i.e. horizontal, vertical, chimney reline, etc.). Also, check for any venting restrictions such as maximum horizontal run, minimum and maximum vertical rise, maximum offset, etc.
- Be fire-safe! Maintain the minimum clearances (air-space) between the vent pipe and nearby combustibles, as specified in the appliance manufacturer’s installation instructions. Use proper support and bracing. Follow local building codes and have your venting system inspected.

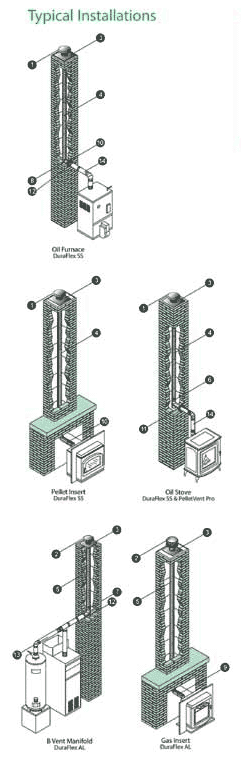
| Installation Key | |||
| 1 | DuraFlex SS Cap | 8 | DuraFlex Mortar Sleeve |
| 2 | DuraFlex AL Cap | 9 | DuraFlex AL Coupling |
| 3 | DuraFlex Top Plate | 10 | DuraFlex SS Connector |
| 4 | DuraFlex (SW, Pro, 304, 316) Length | 11 | PelletVent Pro Appliance Adapter |
| 5 | DuraFlex AL Length | 12 | Type B Gas Vent Pipe Collar |
| 6 | DuraFlex SS Tee | 13 | Rigid Type B Gas Vent |
| 7 | DuraFlex AL Tee | 14 | Rigid PelletVent (L Vent) |
Refer to our Typical Venting Installation drawings to select the appropriate component parts for your installation.
- The Inner pipe diameter should match the outlet size of the appliance.
- Check the appliance manufacturer’s installation instructions to confirm which type of vent configurations are permitted (i.e. horizontal, vertical, chimney reline, etc.). Also, check for any venting restrictions such as maximum horizontal run, minimum maximum vertical rise, maximum offset, etc.
- Be fire-safe! Use proper support and bracing. Follow local building codes and have venting system inspected.

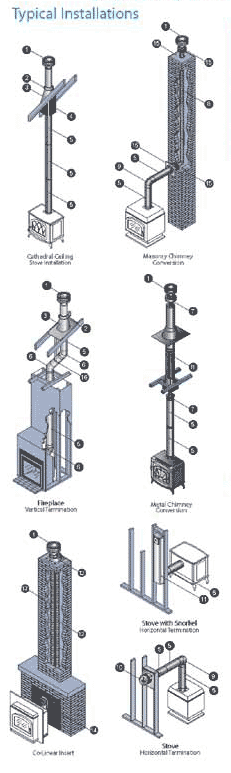
| Installation Key | |||
| 1 | Vertical Termination Cap | 9 | 90° Elbow |
| 2 | Storm Collar | 10 | Horizontal Termination Cap (See listed caps for choices) |
| 3 | Flashing | 11 | Snorkel Termination Cap |
| 4 | Cathedral Ceiling Support Box | 12 | Chimney Liner Termination Kit |
| 5 | Pipe | 13 | 3″ Flex |
| 6 | 45° Elbow | 14 | Co-Axial to Co-Linear Connector |
| 7 | Class A Chimney Conversion Kit | 15 | Masonry Chimney Conversion Kit |
| 8 | 4″ Flex | 16 | Elbow Strap |
Refer to our Typical Venting Installation drawings to select the appropriate component parts for your installation.
